

Google Ads is the source of the highest quality traffic, but also the strictest censor. In 2026, Google uses deep learning to detect content replacement. To successfully "push" an offer (Gambling, Nutra, Crypto), you need flawless camouflage. Cloaking here is not just about splitting traffic, but about creating the complete illusion that you are advertising a white, useful, and safe resource.
2. What do we need to start?
Launching in Google Ads in 2026 is not just about setting up an ad, but about building a technical infrastructure. If even one element is weak, Google will see the inconsistency and ban the entire chain.
Detailed list of tools needed to launch ads:
- Cloaking.House: A cloud-based bot filter. It allows you to manage flows and update moderator databases without changing the code on the site.
- White Page / Offer Page: A "clean" site for Google's check (it can be generated in the Cloaking.House dashboard) and a hidden page with your real offer.
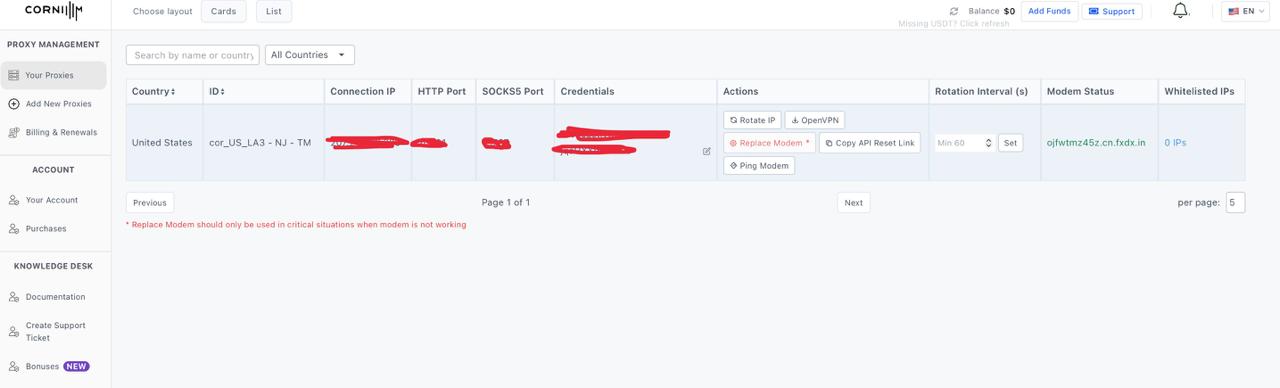
- ISP Proxies (coronium.io): Use only static ones. Proxies from Coronium are identified as home internet, which provides maximum trust and protection against bans for "server IP."
- Accounts (fire-accs.biz): The foundation of the setup. We take warmed-up "farm" accounts with history and cookies from Fire-accs — they pass moderation best and have a long "aging" (rest) period.
- Payments (Pay2.House): Cards with clean BINs. They help avoid blocks due to "Suspicious Payments."
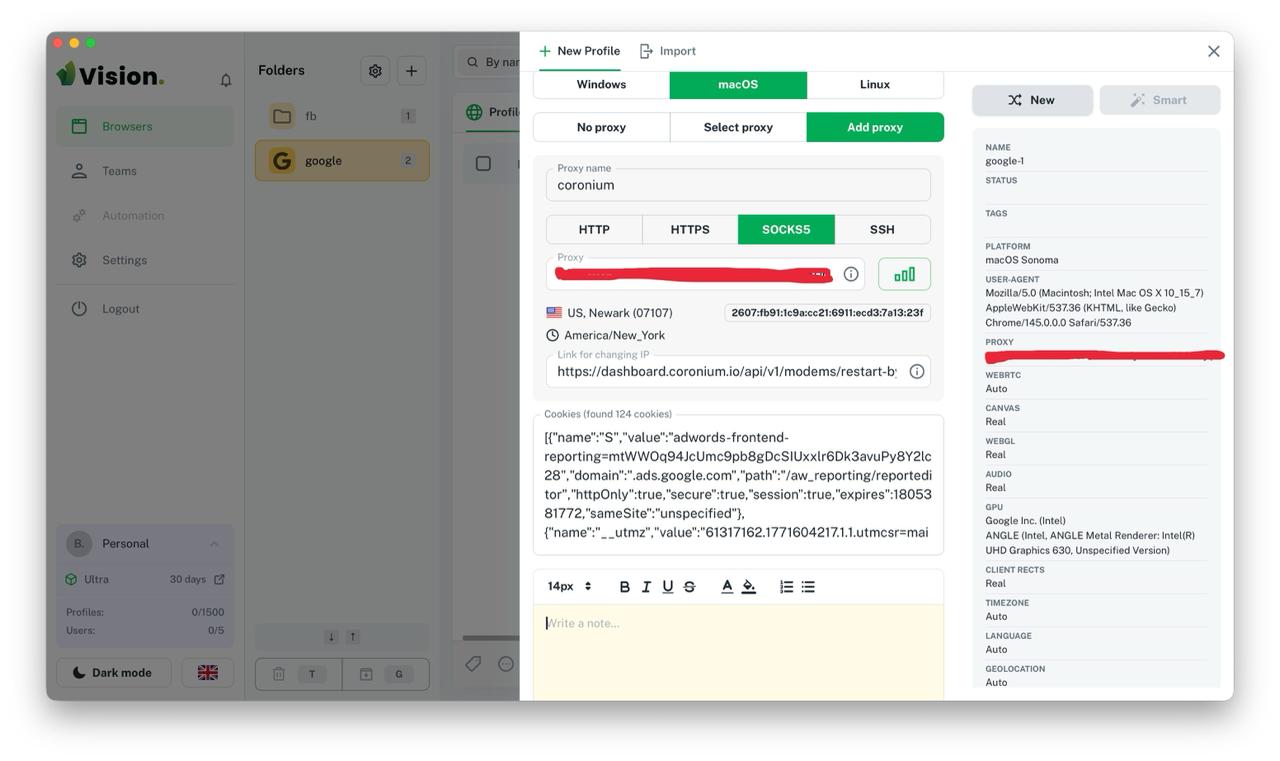
- Anti-detect Browser (VisionBrowser): Isolates profiles by spoofing hardware fingerprints. In 2026, Vision is top-tier for spoofing quality and cookie management convenience.
- Domain and Hosting: .com, .net, or .org zones. Hosting with PHP 7.4+ support for the replacement script to work. In this article, we worked with hosting.xyz
3. Creating a White Page: requirements and sources
In Google Ads, the White Page is the foundation. Google's moderation checks not only for prohibited content but also for the "quality of the resource for the user." If the site looks like a cheap craft, the campaign will be rejected with the note "Low landing page quality."
Technical requirements for a White Page:
- Maximum relevance: If your ad is about "gardening tips," then the White Page must have articles about gardening. Keywords from the ad must be present in the headings (H1, H2) of your White Page.
- Speed and Mobile-First: The site must open instantly. Check it via Google PageSpeed Insights — scores should be in the green zone. 90% of Google's checks simulate mobile devices, so responsiveness is mandatory.
- Legal pages: At the bottom of the site, there must be links to Privacy Policy, Terms of Service, and Contact Us. It is desirable to indicate a real address and a map on the contact page.
- Unique content: Google recognizes stolen content perfectly. Texts must be unique (check them via third-party services), and images must be of high quality.
Where to get a high-quality White Page (Sources):
- AI generator in Cloaking.House: This is the most reliable way. The "AI White Page" tab allows you to generate a unique multi-page site for a specific vertical. The neural network writes the texts and selects the structure itself, which Google considers "trustworthy."
- Important note: We categorically do not recommend copying other people's sites via Spy services. Google stores "snapshots" of almost all sites in its database. If you upload a copy of a site that has already run in ads or is simply indexed, you will receive a ban for "System Circumvention" at the review stage.
Moving to practice: Generating an AI White Page in Cloaking.House
Once the technical requirements are clear, we proceed to creation. The safest path for Google Ads is to use the built-in neural network generator. It creates unique code and content that has no history in Google's database.
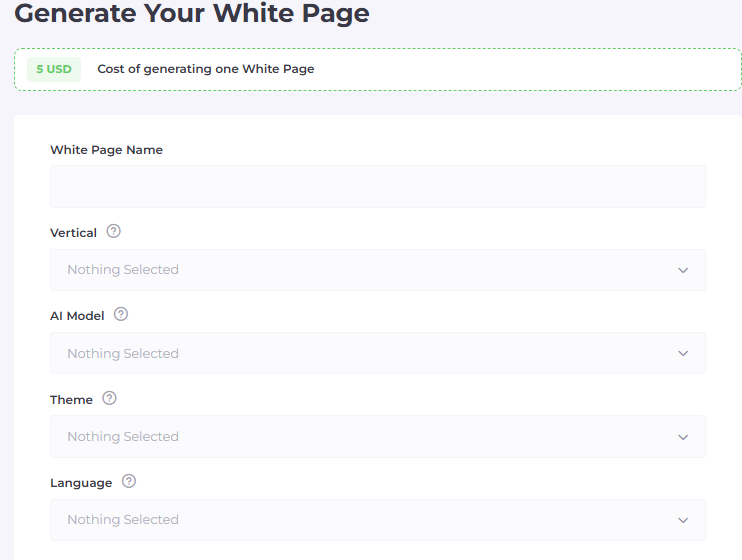
Go to your Cloaking.House personal account and navigate to the "AI White Page" tab.
Main fields to fill:
- Name: Internal name for your project (the moderator does not see it).
- Vertical: Choose a niche (e.g., Nutra, Gambling, or Technology). This sets the direction for text generation.
- AI Model: Selection of the site structure. One Page — a stylish landing page. For Apps — optimized for app launches. For Ads — the ideal choice for Google. It creates a full multi-page site, which maximizes trust in the eyes of moderators.
- Theme: Visual design style.
- Language: Choose the language of the target GEO.
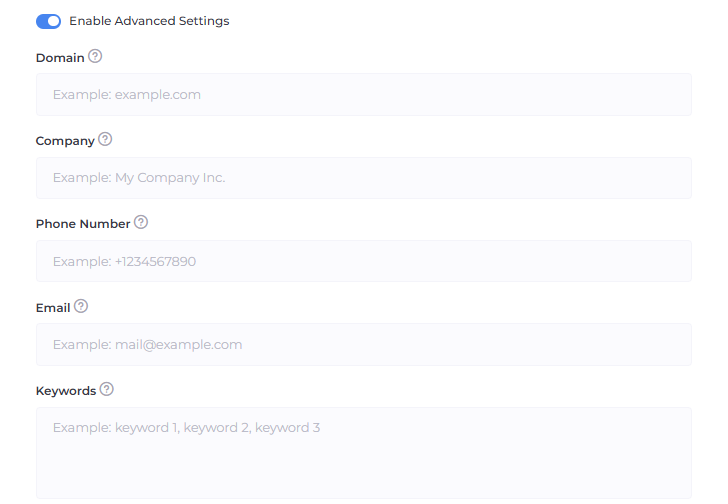
Additional settings (Advanced Settings):
Do not ignore this block! This is where details that "lull" Google's vigilance are entered.
- Domain: Specify the domain where the white page will be hosted.
- Company Name, Phone, and Email: Be sure to enter these details. The neural network will automatically place them on the "Contact Us" page and in the footer. For Google, having "live" contacts is a huge plus for trust.
- Keywords: Enter 5–10 words related to your "white" topic. The neural network will weave them into the texts and headings, providing the very relevance the moderator is looking for.
After filling everything out, click the "Generate" button. After a few minutes, the system will provide a ready archive, which only remains to be uploaded to the hosting.
The installation process on the hosting takes less than a minute:
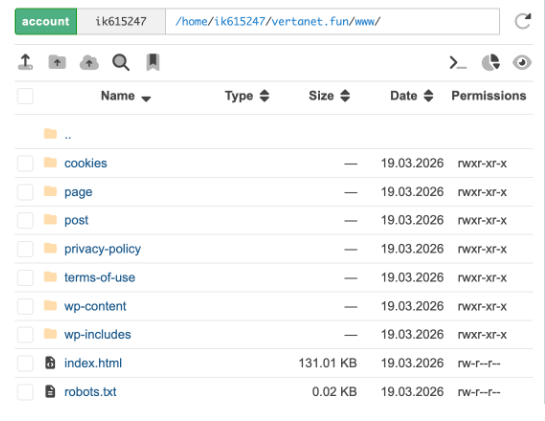
- Go to your hosting control panel (this article uses hosting.xyz) and open the "File Manager."
- Go to the root folder of your domain (usually public_html).
- Upload the received archive there and click the "Extract" button.
All White Page files, images, and folder structure will automatically fall into place. You don't need to layout or code anything — the neural network has already done all the work for you. After extraction, the archive itself can be deleted to save space.
4. Creating a flow in Cloaking.House
Step 1: Name and selection of paths (White & Offer)
At this stage, we set the basic routes for traffic. It is important to choose the right content display methods to avoid leaving "digital footprints" for Google.
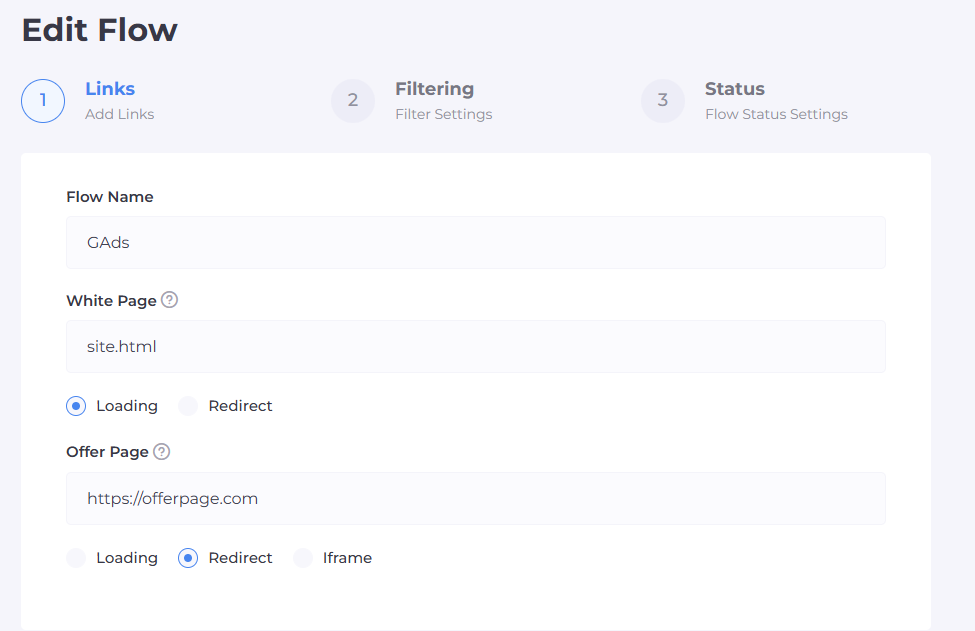
- Flow Name: Enter a unique name. It is better to use the offer name and GEO to avoid confusion when scaling.
- White Page: Enter the name of your file (specify the full filename with its extension: if your white page is PHP — write site.php, if HTML — site.html). In the dropdown menu, select the "Loading" method. This is critically important: with loading, the address in the browser bar remains the same, which does not cause suspicion from Google. We will carry out the file integration on the hosting a bit later.
- Offer Page: Enter the path to your real offer. If your offer is on an external resource (affiliate link), select the "Redirect" method. If the offer is uploaded to your hosting as a file — use the loading method.
Step 2: Fine-tuning filters (Intelligent Barrier)
Here we build the protection system that will determine: is it a live person or another spy bot from Google.
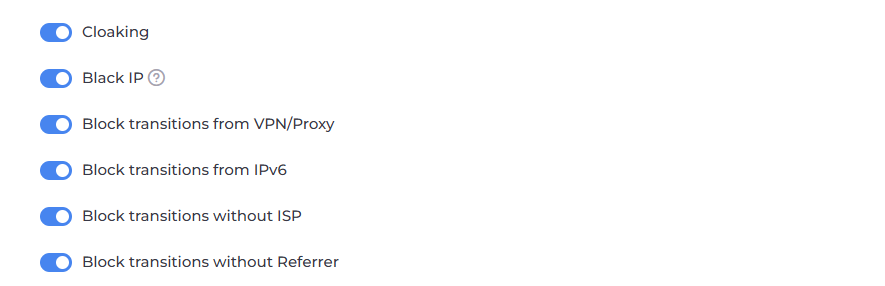
Main filtration toggles:
- Cloaking and Black IP: Must be turned on. This is Cloaking.House's automatic database that knows most moderators and bot networks by sight.
- Block VPN/Proxy: Turn it on. Google moderators almost always use proxies for masking. A real buyer enters from their provider's direct IP.
- Block IPv6: Be sure to turn this OFF. Note for Google Ads: Google's checks often go through the IPv6 protocol. If you block this protocol, the Google bot won't even be able to reach your White Page, which will lead to ad rejection.
- Block without ISP: Turn it on. This filter kills visits from data centers (Amazon, Google Cloud). If a visitor doesn't have a real provider name (ISP) — it's a 100% bot.
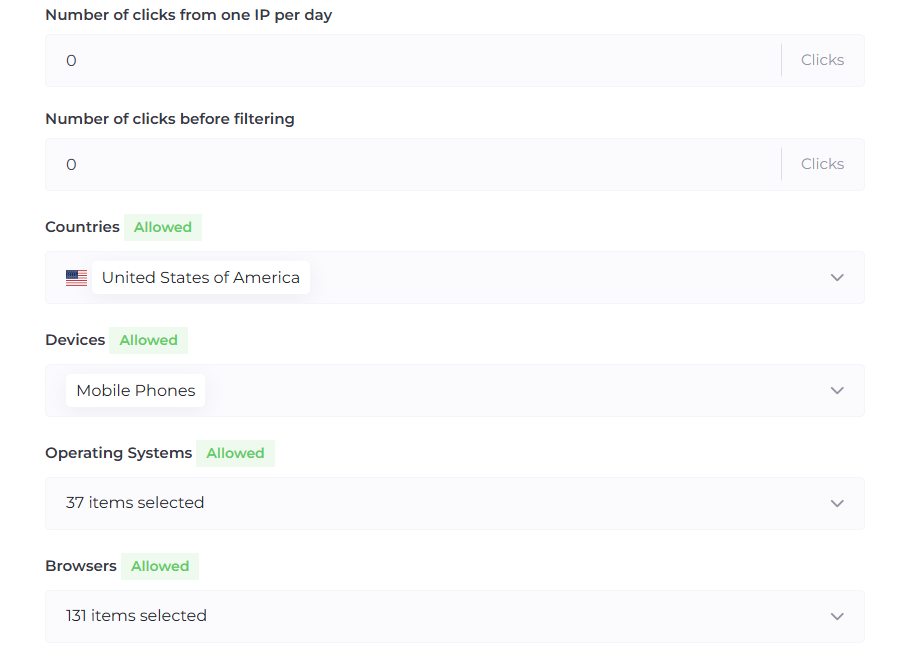
Segmentation and Targeting:
- GEO: Choose strictly the country where you are launching ads. Any transition from another region will be automatically sent to the White Page.
- Devices, OS, and Browsers: Cut off everything unnecessary. If you are running only for mobile Android traffic — block desktops and iOS.
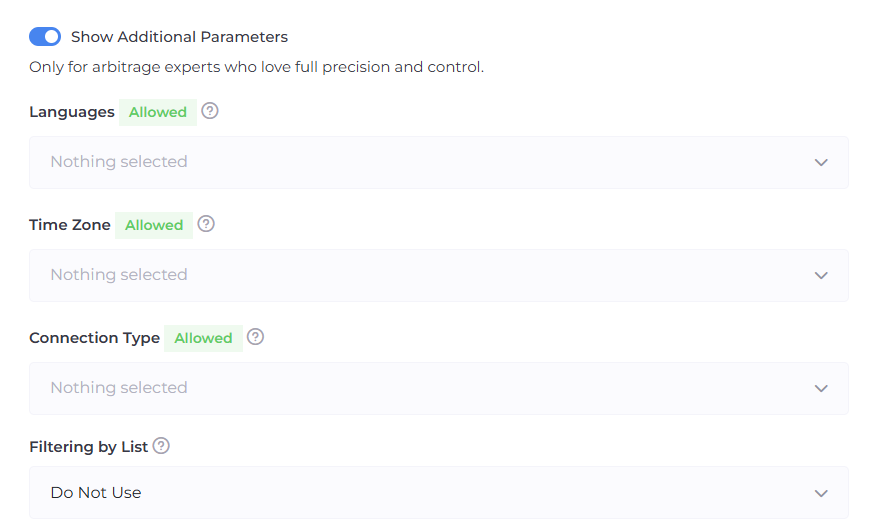
Additional settings:
- Languages: Set up a filter by browser language. If you are advertising in Germany and a user with English or Chinese language enters — the system will send them to the White Page.
- Filtration Lists: If you have accumulated databases of "bad" IPs, connect them here in the Black List format.
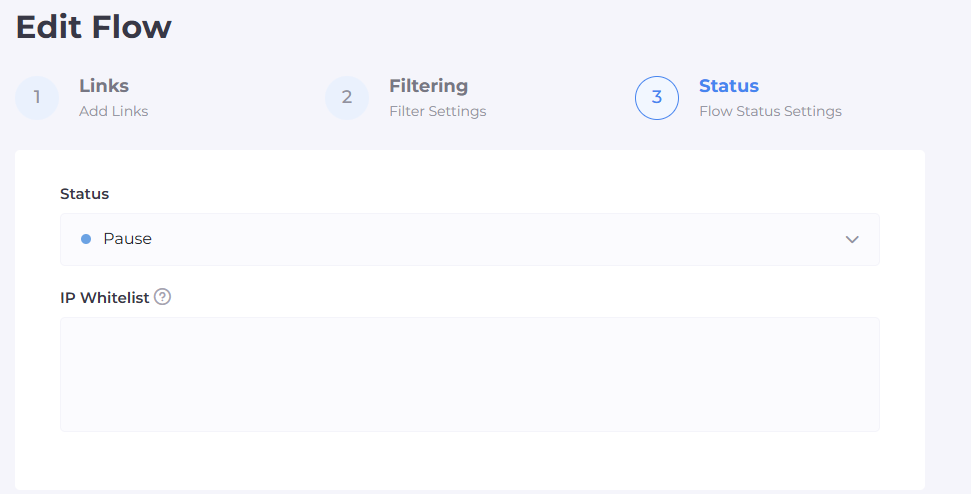
Step 3: Status and access check (White List)
The final stage where we activate the flow and check its performance "on ourselves."
- Flow Status: Select "Active" if you are ready to work, or "Pause" if you want absolutely everyone (including you) to see only the White Page until a certain moment.
- White List IP: Find the field for IP address entry and paste your current IP there. This will add you to the "white list": you will be able to bypass all filters and see the Offer Page to ensure the offer displays correctly.
Step 4: Cloaking.House integration on your site.
Now that the domain and hosting are fully ready, it’s time for the most important part — to "bring to life" our protection. We need to integrate the cloak file onto our hosting and domain prepared earlier. Don't be scared by the technical part: this is done very simply, literally in a couple of clicks, and does not require programming skills. We are now turning an ordinary site into a powerful filter that will invisibly split Google moderators and real clients into different pages.
Step-by-step integration algorithm:
- Download the file: Go to your flow in Cloaking.House and download the integration file index.php.

- Upload to hosting: Via your hosting's file manager, upload this file to the root of the site (public_html folder).
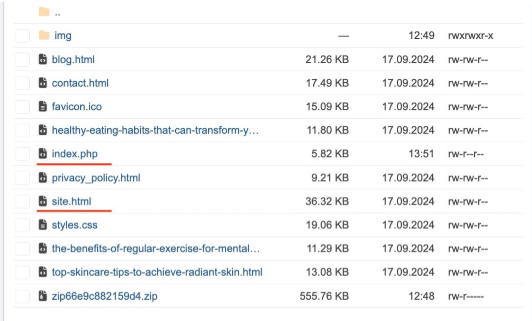
- Rename files: This is an important moment! The file that is currently your "white" site (usually index.html) needs to be renamed to site.html (or the name you specified in the White Page field when creating the flow).
- Activation: * Now, when accessing the domain, our index.php will trigger first.
- In the Cloaking.House dashboard, change the flow status from "Pause" to "Active".
- Be sure to check your IP in the White List to ensure that the Offer Page opens for you personally, while the White Page opens for everyone else (and Google bots).
Important notes for Google Ads
Remember that Google is a "smart" opponent. To successfully bypass moderation at this stage, adhere to the following rules:
- PHP integration only: For Google Ads, server-side integration via a PHP file is best.
- Clean referrer: The Cloaking.House system automatically ensures that the transition to the offer looks natural.
- Initial warm-up: We recommend first running the flow in "Pause" mode for 1-2 days so that Google scans only your White Page, and only after successful ad approval, switch the flow to "Active."
5. Setup Assembly: From data in a text file to a working profile
When you buy an account and proxy, you are sent a set of incomprehensible strings. Your task is to correctly transfer them to the anti-detect browser so that Google sees you as a real user, not an arbitrageur with a "farm."
Step 1: Dealing with the data
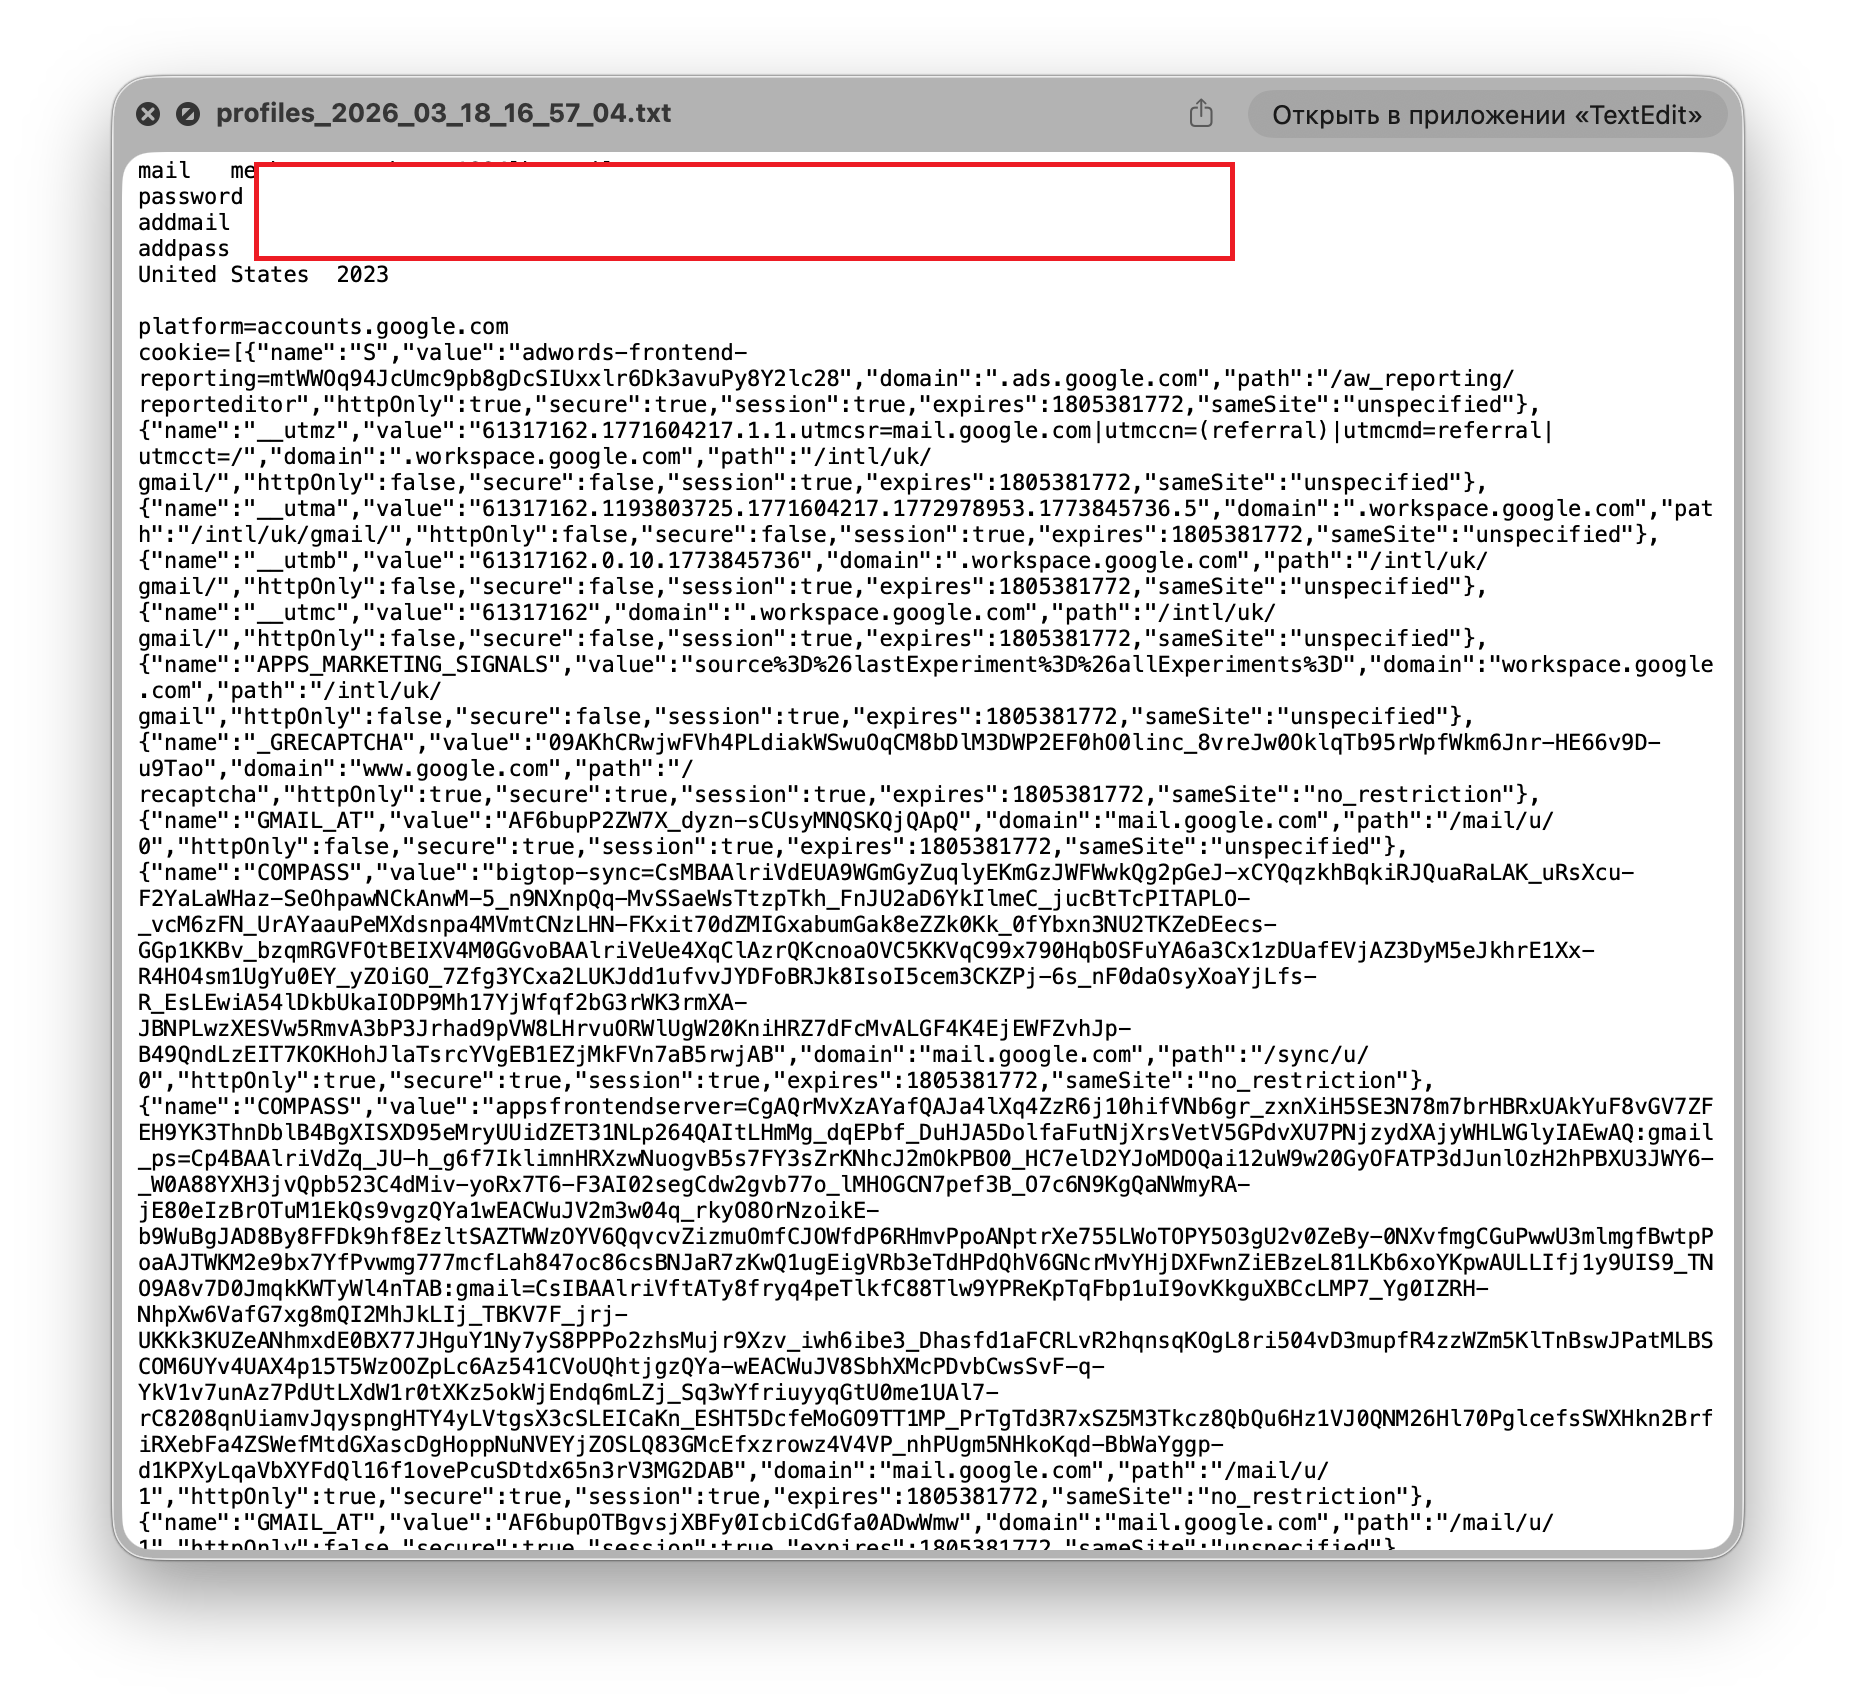
Usually, the data after purchase looks like this:
- Account: login:password:recovery_email:2fa_key (or a cookie file in .json / .txt format).
- Proxy: ip:port:user:password or host:port:user:password.
Step 2: Comprehensive profile setup
In modern anti-detects like VisionBrowser, all key data is entered in one window. This allows you to quickly assemble the "personality" of the future advertising account without switching between tabs.
In the profile creation window, we fill in the following blocks:
General Information:
- Name: Write a clear name (e.g., Google_US_Farm_1) so as not to get confused in the account grid.
- Operating System: Choose the OS you actually work with (Windows or macOS). This is critical for the naturalness of system fonts and headers.
- User-Agent: We recommend leaving the default value — the anti-detect will automatically insert the current browser version that matches the chosen OS.
Proxy Setup (Your network address): This is the most critical stage. Google checks your IP for connection type and presence in blacklists.
- Protocol: Select SOCKS5 (the most secure standard for arbitrage).
- Data Input: Just copy the ip:port:user:pass string from the coronium.io dashboard and paste it into the field — VisionBrowser will distribute the data into the cells itself.
- Check: Be sure to press the "Check Proxy" button.
- Result: You should see a green checkmark. Critical: the "Type" column should say Residential or ISP. If it says "Data Center" — Google Ads will ban such an account almost immediately.
Cookie Import: If you bought a high-quality account at fire-accs.biz or another site, you need to import cookies in this same window.
- How to insert: Paste the cookie text into the special field or simply drag the file into the import area.
- Why it's needed: Cookies create a "life history" for the profile. Google sees that you have already visited other sites, rather than just opening a new browser for the sake of ads. This significantly increases the account's trust at the start.
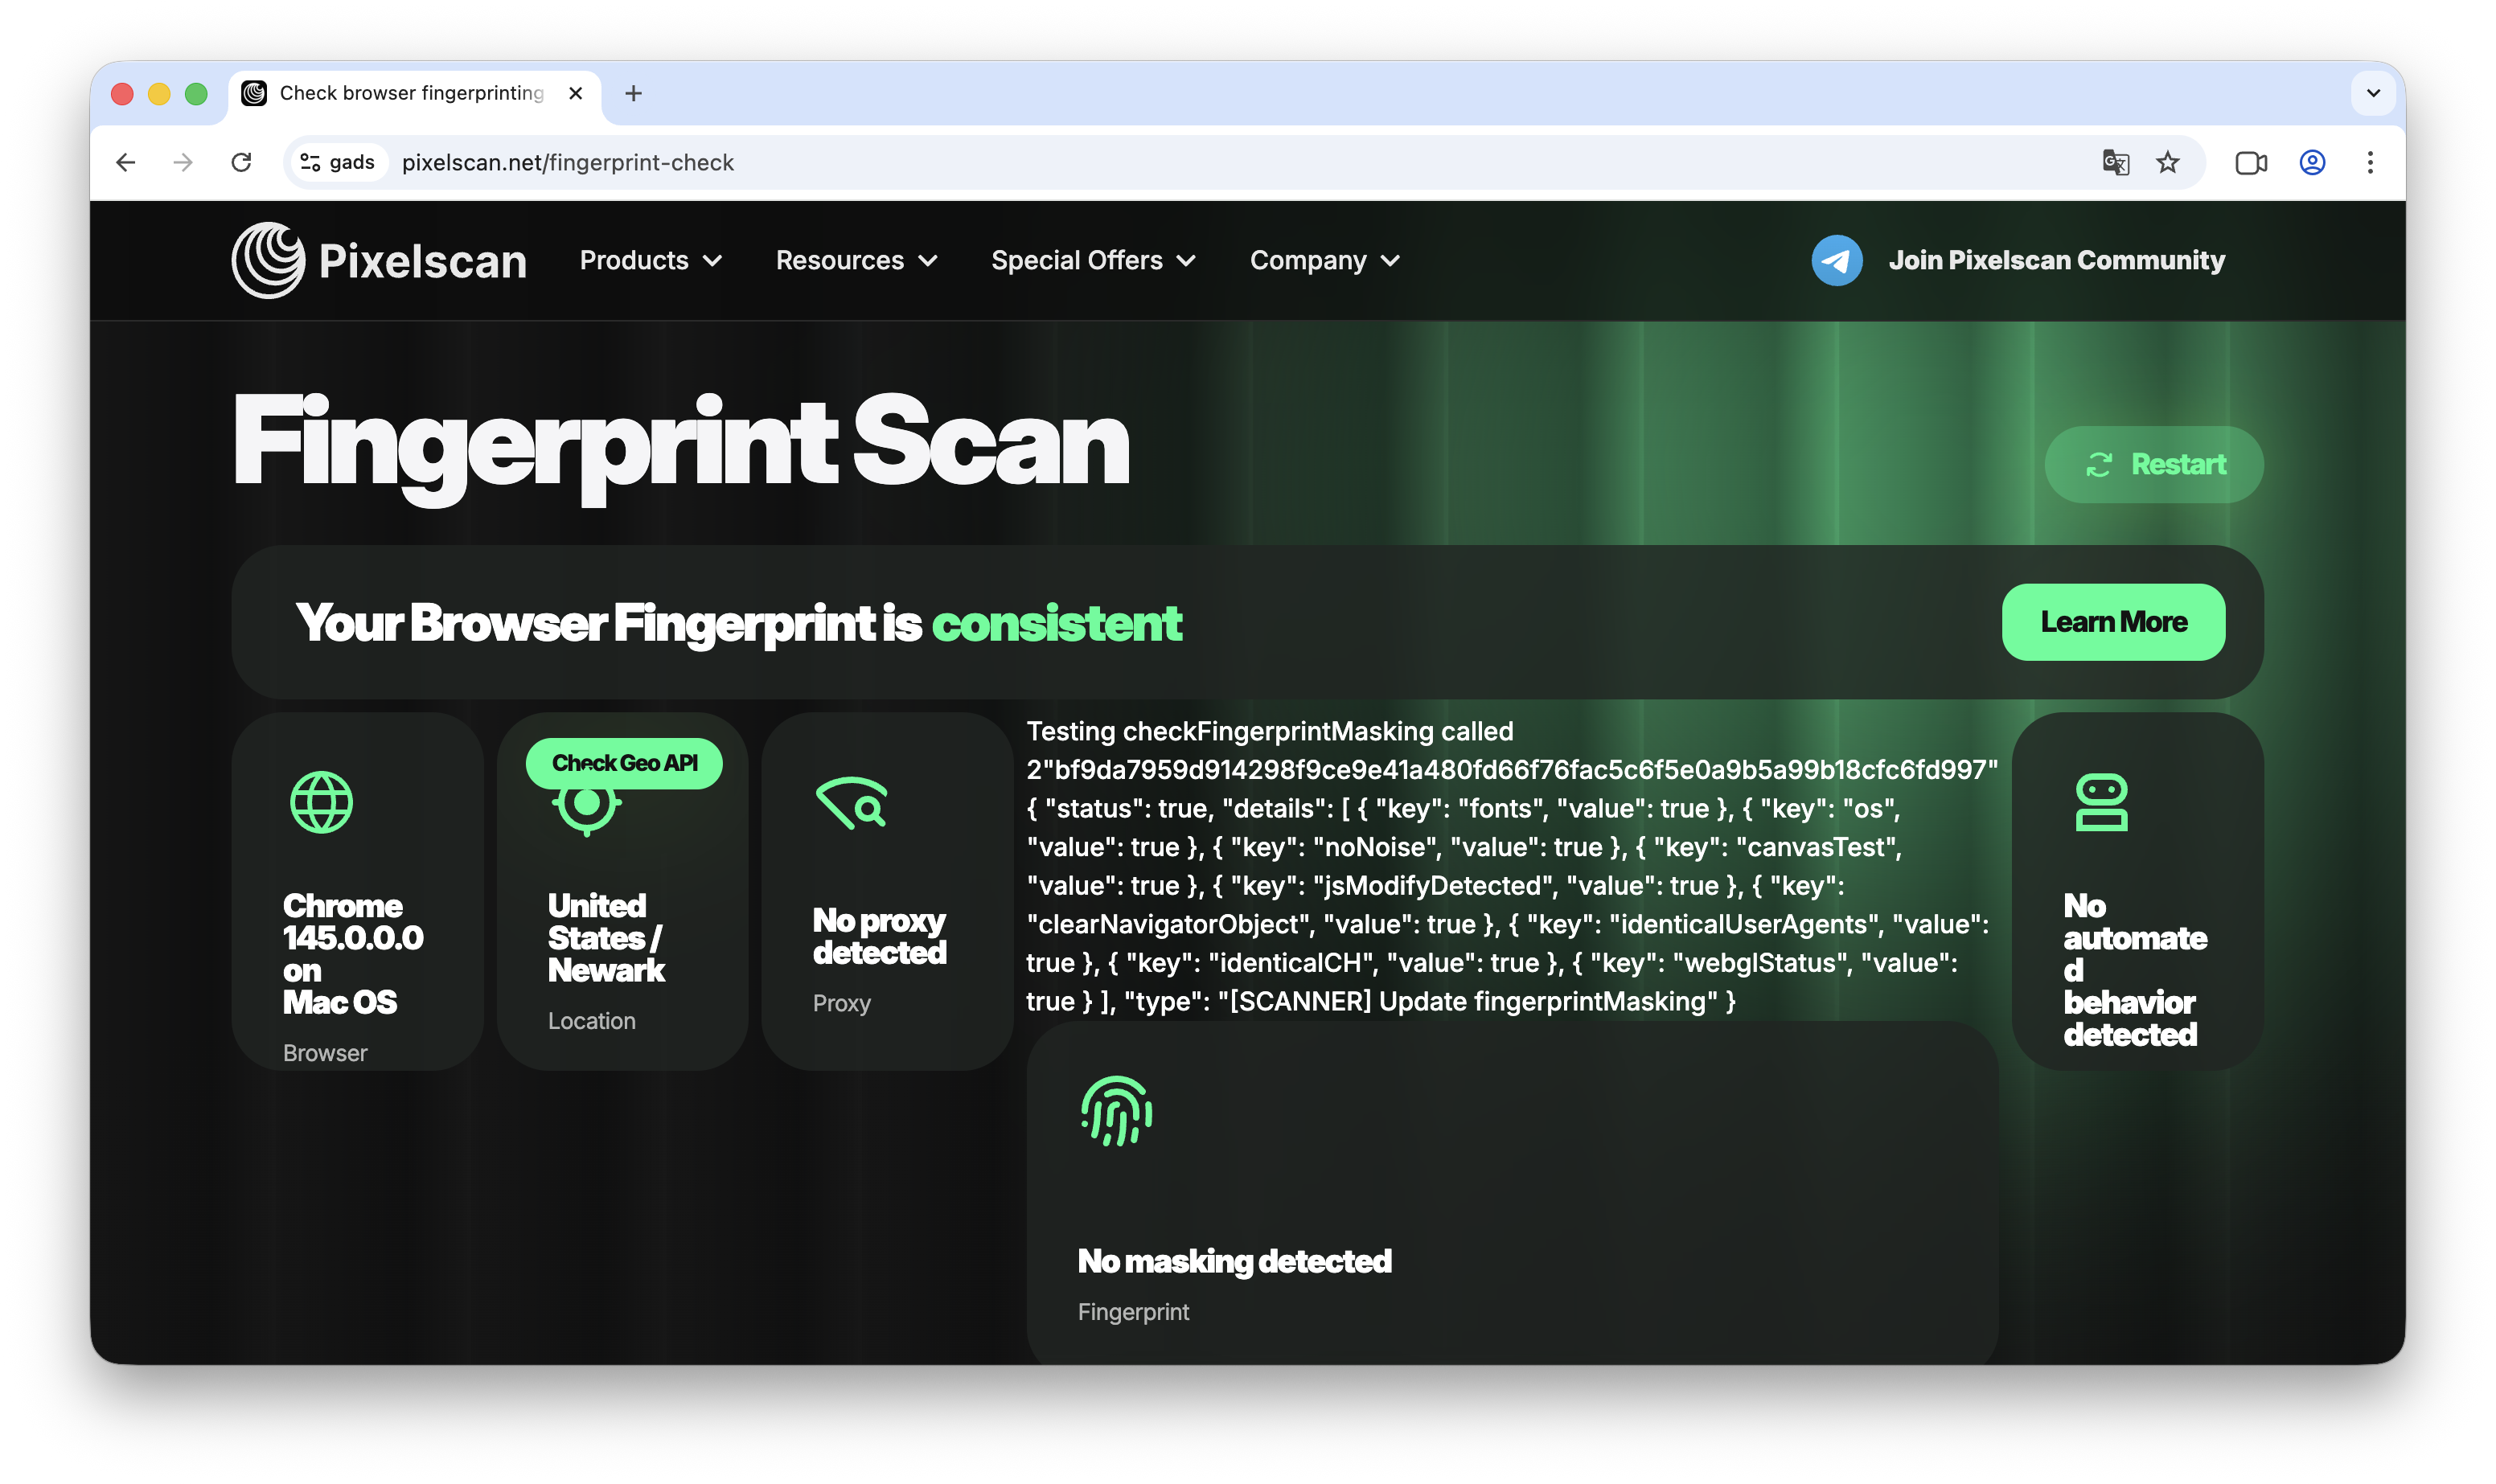
Step 5: Check and first "touch" with Google
- Launch: Click "Start." A clean browser window opens.
- Checking: First thing, go to Pixelscan.net. All indicators should be green (Masking: No leaks). Location and Timezone should match your proxy.
- Authorization: Don't run straight to ads.google.com. First, go to google.com, check Gmail, stay in the profile for 5–10 minutes.
- Entering Ads: Only after this, go to the advertising cabinet. If Google requests verification (2FA) — use the key or code from the email (recovery email) that came with the account.
Step 6: Aging (Critically important!)
After you have successfully logged into the account — do not set up anything. Close the profile and leave it for 24 hours.
Why is this needed? For Google's algorithms, sudden activity (logged in -> linked card -> launched ads) is a marker of a hack or suspicious actions. Give the system time to "get used" to your new device and IP.
6. Payment Solutions: Working with Pay2.House and linking to Google Ads
Google Ads is very picky about bank BINs (the first digits of the card). We use Pay2.House because their cards have a high level of trust and link perfectly to cabinets.
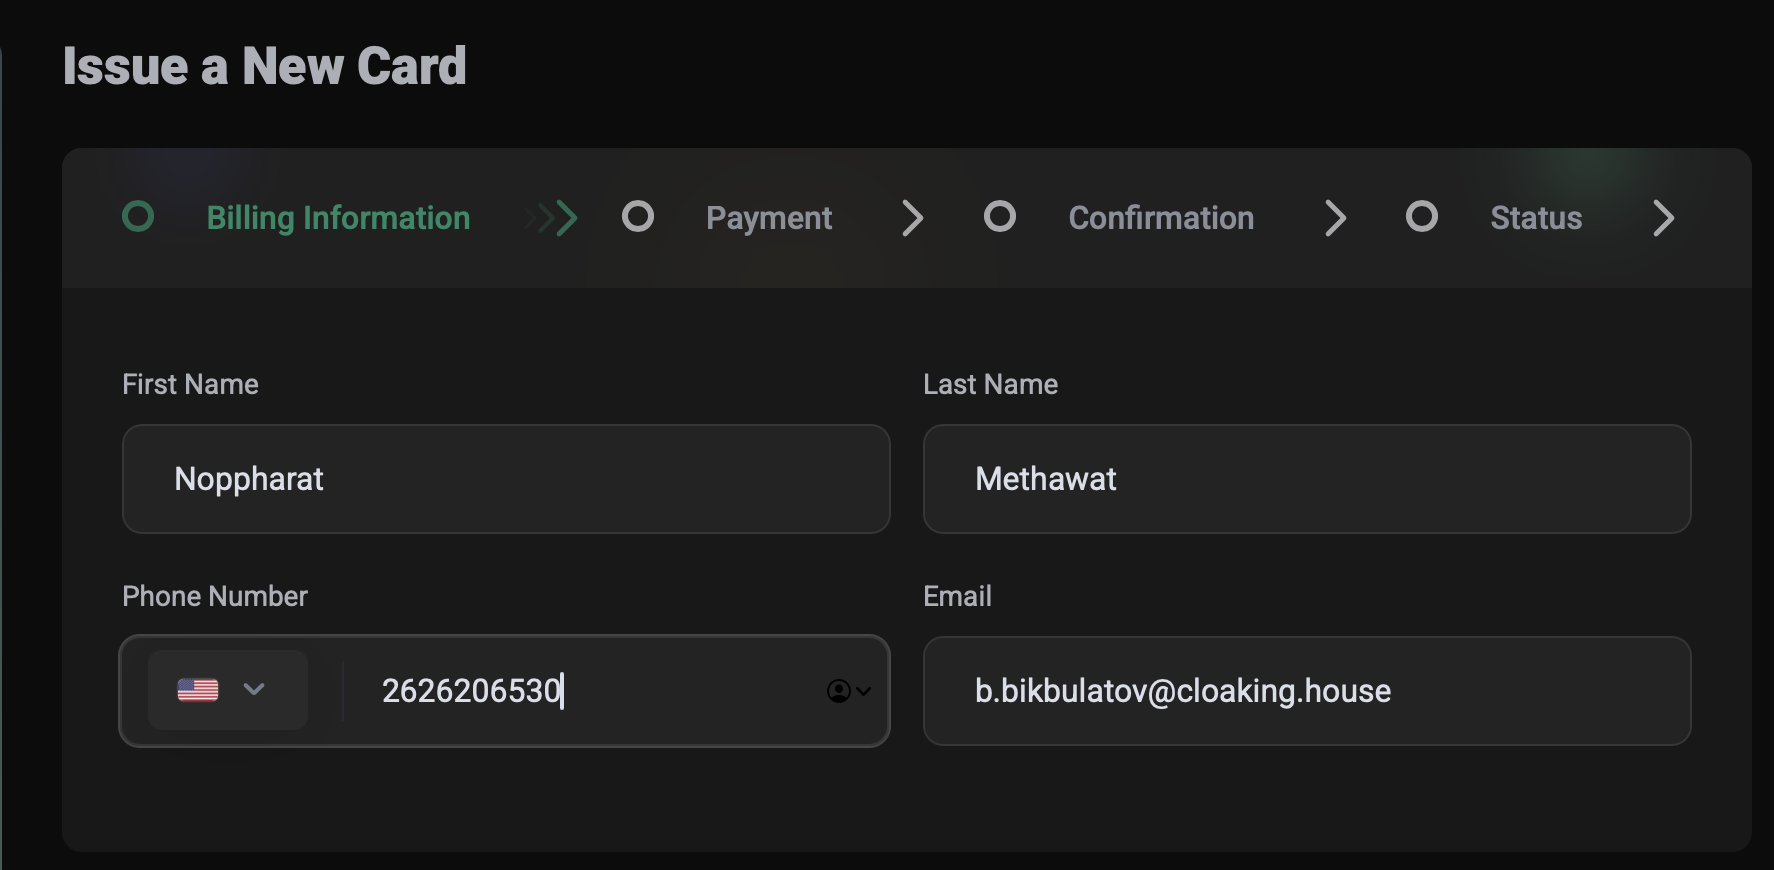
Step 1: Creating a card in Pay2.House
Before going to the Google advertising cabinet, we need to issue a suitable card.
- Access the service: Log into your Pay2.House personal account.
- Select Section: Go to the "Cards and Accounts" tab.
- Card Type: Click the "Create Card for Ads" button.
- GEO Selection: Choose the card issuance country. Important: The card's GEO must strictly match your Google account's GEO (e.g., if the account is US, the card must also be US).
- Owner Data: In the window that opens, enter the First Name, Last Name, and phone number. You can use real data from your Google account (for maximum trust) or any other data — the service allows issuing cards to any details.
- Security: To confirm the operation, you must have Google Authenticator (2FA) connected. Enter the code from the app.
- Issue Payment: Select the account from which the funds for card creation and initial balance will be deducted.
- Activation: Click "Confirm" and wait for the card to appear in the list. This usually happens instantly or within a couple of minutes.
Step 2: Rules and the process of linking a card to Google Ads
In arbitrage, it's not just the choice of BIN that matters, but also the right timing. Any haste at this stage is a direct path to a "Suspicious Payments" flag.
1. Card Preparation and Activation After you have issued a card in Pay2.House, it must be topped up (at least by $5–10). This is necessary so that the CVV and card expiry date become active and display in the cabinet. Additionally, Google will definitely make a test charge ($1), which it will return immediately. If the balance is 0 — the card will be rejected.
2. Billing Profile Setup Add a residential address. Don't use generators — take a real address from Google Maps.
- Billing Country: Must strictly match your card's GEO.
- Account type: Individual.

3. Entering Card Data Carefully transfer the card number, expiry date, and CVV.
- Cardholder Name: Write what you specified in Pay2.House.
- Click "Submit".

4. Skipping Google Tag Setup After successful linking, Google will suggest you install Google Tag for conversion tracking. At the current stage (while we are launching only a "white" campaign), we skip this step. We don't need extra scripts on the site before passing moderation to avoid creating unnecessary technical "traces."
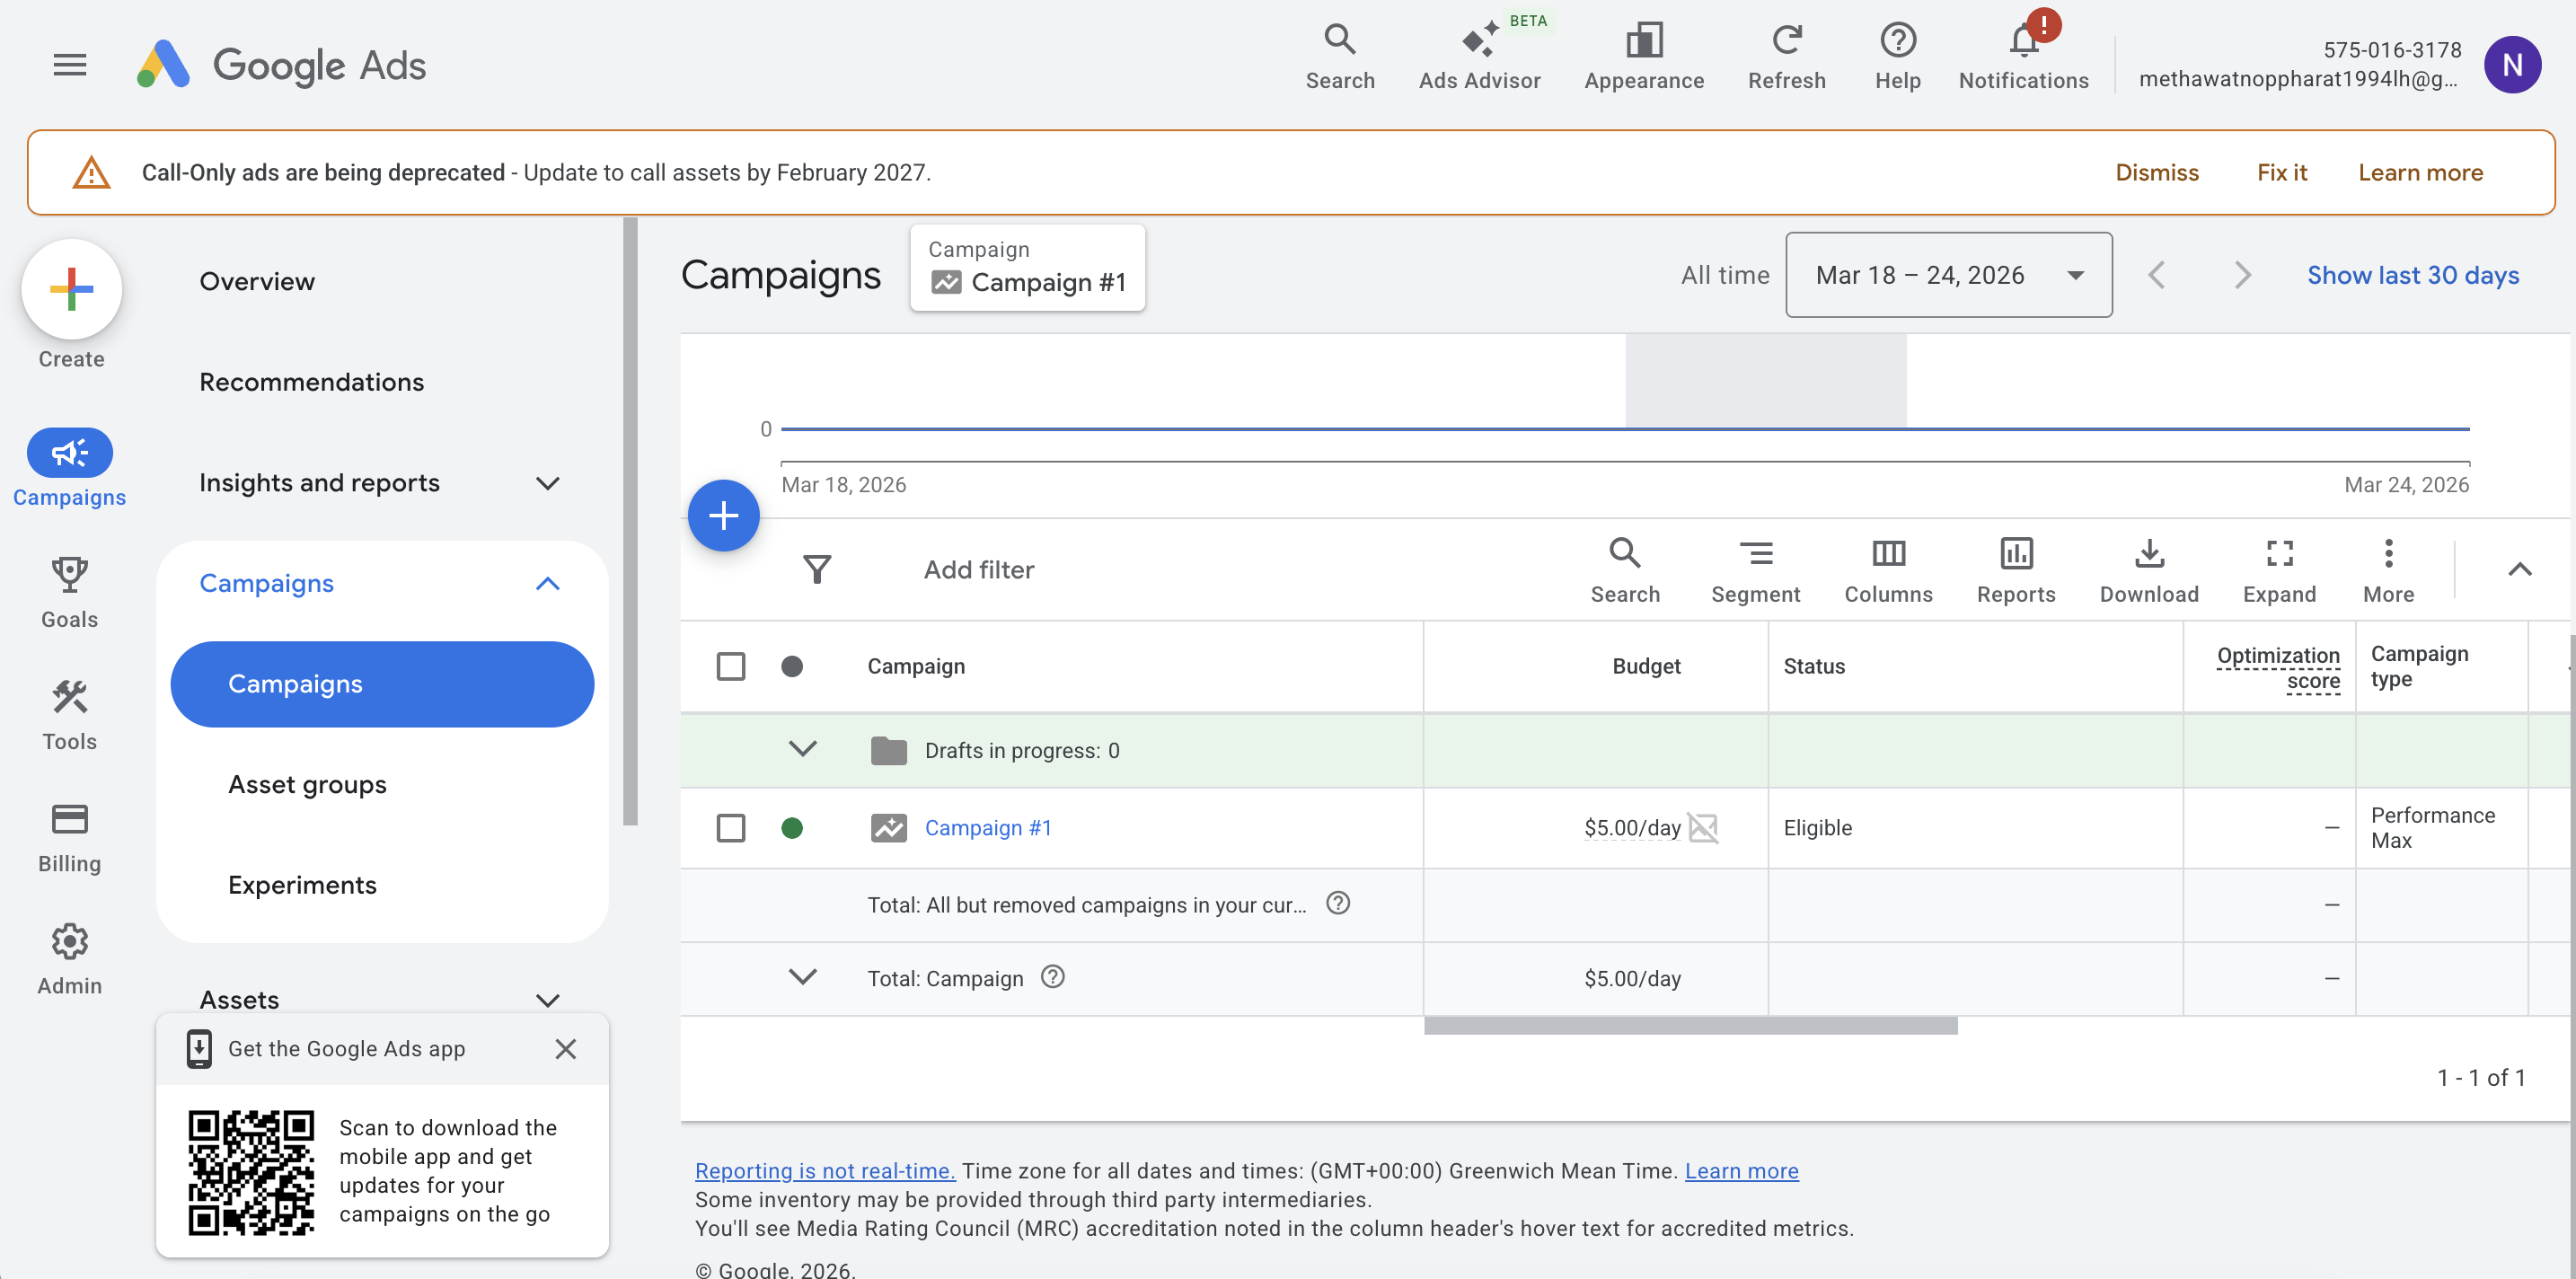
5. Moderation and "Silence Mode" You will be redirected to the main ad cabinet, where in the "Campaigns" section you will see your ad with the status "Under Review".
7. Campaign and Account Warm-up
This is the stage of building a "trusting relationship" with Google's neural network. Our task is to prove that we are a real business with a working site.
- Launch: Launch the campaign strictly to your White Page (about relationships, gardening, etc.). You can put the flow on pause and all clicks will go only to the White Page.
- Budget: Start small — $5–10 per day.
- Goal: Get "Approved" status and the first 10–20 real clicks from live users.
- What's forbidden: In the first 3–4 days, you must not sharply increase the budget, change links in ads, or add new, more aggressive creatives. Any sudden movement is a reason for repeated manual check.
- Checkpoint: The account should spend from $20 to $50 on the white topic. Once the money is spent and the campaign runs stably — we are ready for "magic."
8. Click Analytics and Working on Errors
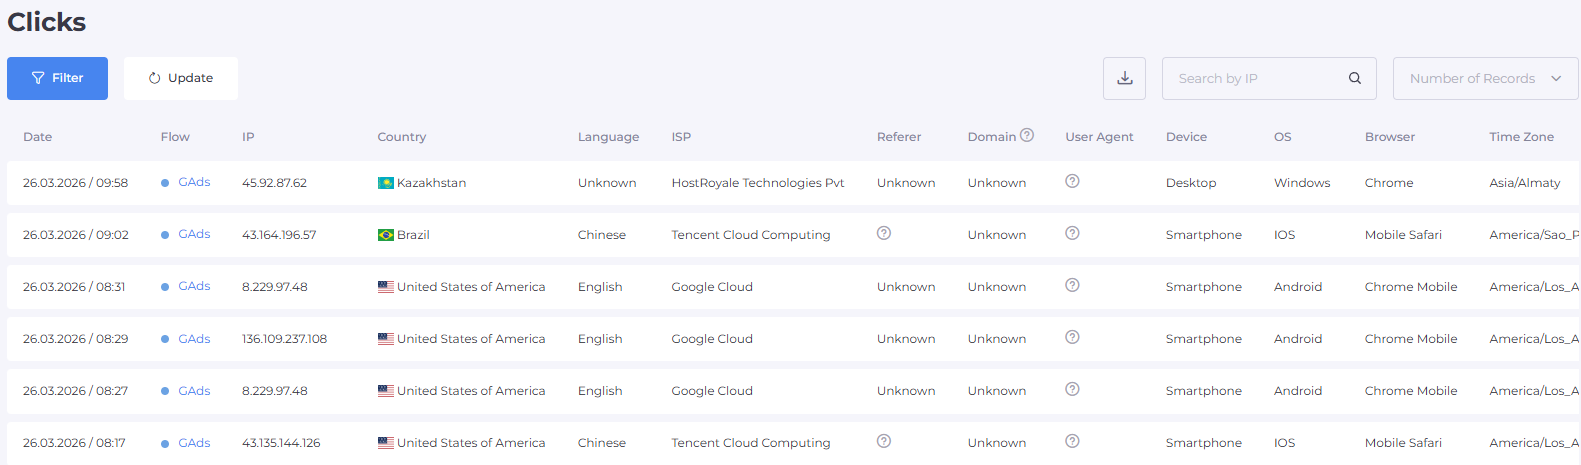
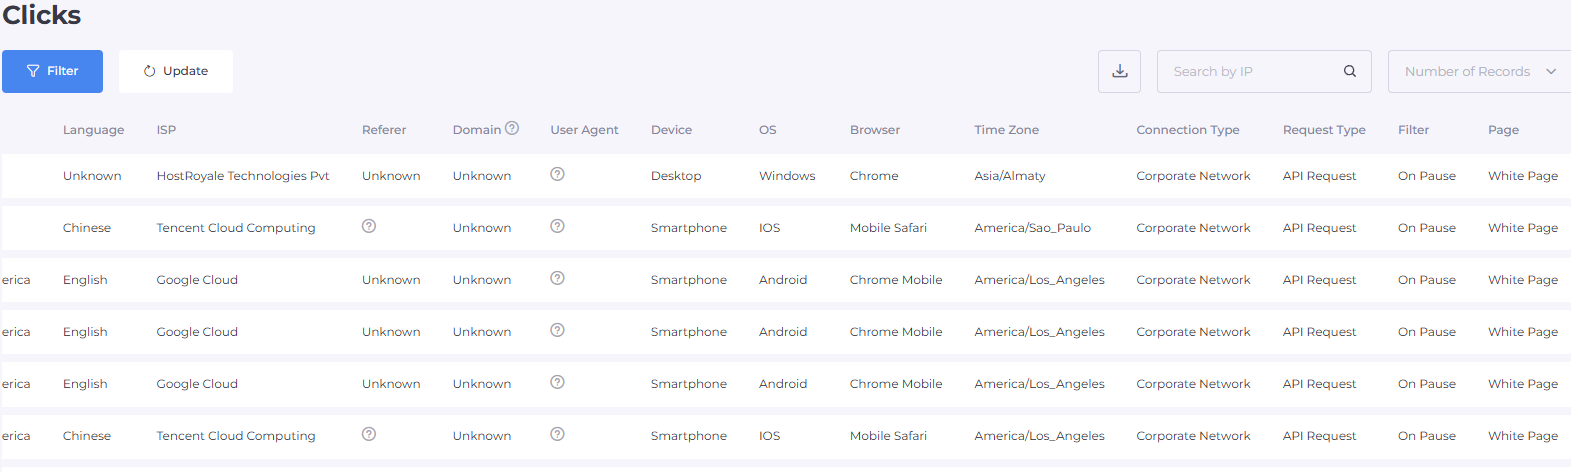
After launching the flow, your main tab is "Clicks" in the Cloaking.House personal account. Here, the "battle" for your offer is displayed in real-time.
How to read the clicks table?
At the end of each row in the table, you will see the click status:
- Cloaking: These are bots, moderators, or users who did not pass the filters. If you see massive visits from the US (especially the city of Mountain View) — these are Google's neural networks scanning your site. This is normal; it means the protection is working.
- Client: Congratulations! This is a live person who successfully passed the filters and saw your Offer Page.
Important point: If you see that a real target client landed on the White Page, be sure to look at the "Reason" column.
- It will state which filter triggered: e.g., VPN/Proxy, IPv6, or ISP.
- If there are many such clicks, analyze them — perhaps you set the settings too strictly for your GEO, and it's worth "loosening" them a bit so as not to lose profit.
9. Final Tips for Survival in Google Ads
- Forget about redirects: In 2026, Google Ads instantly bans for any redirects. Use only the Loading method via a PHP file for the white page. This allows you to replace content right "under the hood" of your domain.
- A ban is not the end: If an account goes for review (Suspicious Payments or System Circumvention), don't rush to delete it. If you had a high-quality setup, clean proxies, and a unique White Page — file an appeal. Often, after manual review, trusted accounts return to service.
- Redundancy strategy: Never bet everything on one account. In Google Ads, stability is the number of attempts. Always keep 2–3 warmed-up profiles with linked cards in reserve, ready for launch.
Tariffs and Bonus for Starting
Arbitrage requires investment, but Cloaking.House makes the entry as comfortable as possible. We offer flexible tariffs for any volumes:
- 7-day Trial: Every new user gets a free week — this is the perfect time to pass moderation and get the first payouts.
- 50% Discount: When paying for an annual subscription, you save half the cost. This is the best choice for professional teams.
- Our Gift: Use promo code BVBV_BRO_30 when paying for any tariff and get a 30% discount.

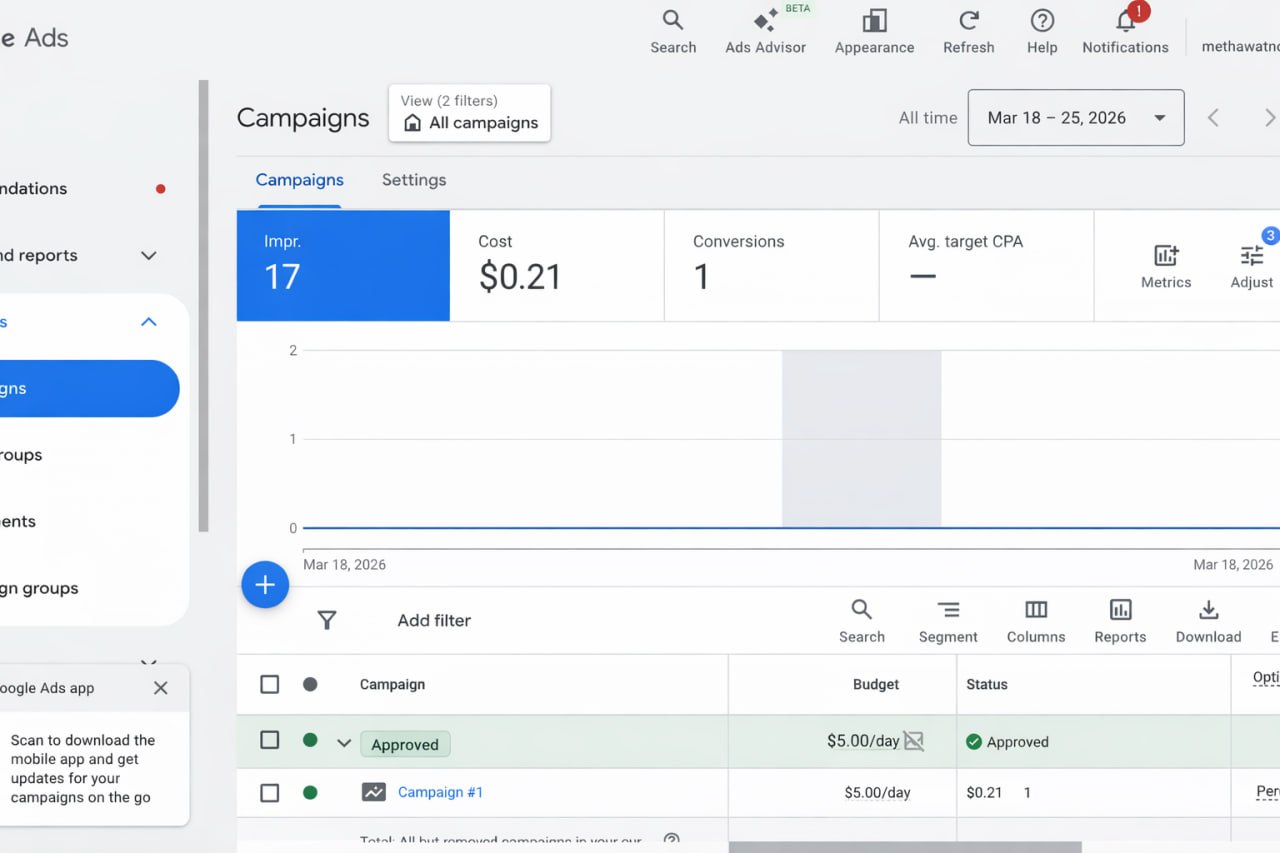
10. Result: Successful Moderation and Launch
The final stage of any technical setup is the verification of the campaign by the advertising network. If all previous steps (choosing residential proxies, creating a unique White Page, and setting up PHP integration) were performed correctly, Google Ads' protective algorithms will recognize the resource as safe for users.
Below is an example of an advertising cabinet after passing the review. The Approved status and the presence of the first impressions confirm that the traffic filtering system is operating normally: bots and moderators are directed to the prepared "white" site, while target users gain access to the offer.
Getting this result confirms that your technical base is built correctly, and you are ready to scale the campaign.
Conclusion
Google Ads is the "major league" of arbitrage. Yes, it's difficult here, but this is where the biggest money and the highest quality traffic circulate. With the right approach, high-quality white pages, and powerful filtering from Cloaking.House, you will be able to bypass any neural networks and run in stable profit.
Ready to test your setups in action?
Register, set up your first flow, and take the profit that previously seemed out of reach!


Be the first to share your opinion!
We value your feedback — share your thoughts.